Thank you for purchasing this product. This camera has a unique ultra-portable design, which means it can be used in a variety of areas to bring you convenience, security and a colourful everyday life. Please follow the steps in the instructions to set up your camera correctly.
You also have a Youtube video of how to configure the “TCAM” application with a clock camera.
Prerequisites :
1. Before you start, make sure you have the following items:
1- A 2.4 GHz Wi-Fi router with password. 2- The camera fully charged to ensure optimum configuration. 3- A smartphone running one of the following systems: * Android (version X or higher). * iOS (version Y or higher). 4- The dedicated application (download from Google Play or Apple Store).
1. Preparing the camera
1.1 Switching on the camera
To switch the appliance on:
Depending on your model, open the cover on the back of the camera.
Depending on your model, remove the plastic protection on the right of the battery to make contact.
press the ON/OFF button, if not already done
1.2 Indicator light
Red light: Power indicator, always on when charging.
Blue light: Wi-Fi indicator. Indicates that the camera’s Wi-Fi is visible.
Connect the camera to a power source using the USB cable supplied.
Make sure the charge indicator light (red) is on.
📌 Tip: Use a thin object to access the reset button. (if necessary):
If you have connection problems, hold down the reset button for 5 seconds.
Wait for the camera to reboot automatically (approximately 30 seconds).
2. Installing the application
Search for the“TCAM” application on Google Play (Android) or the Apple Store (iOS).
Or Scan this QR code or the one supplied in the packaging to go directly to the download page.
Follow the on-screen instructions to complete the installation.
3. Adding the camera to the TCAM application
3.1 AP connection
Once the device is switched on, it transmits a WiFi network, the name of which generally begins with “F” followed by numbers:
Go to your phone’sWiFi settings and connect to this network.
Open the ‘TCAM’ application you have downloaded.
Refresh the page by swiping down.
Open the“TCAM” application and accept the authorisations (if applicable).
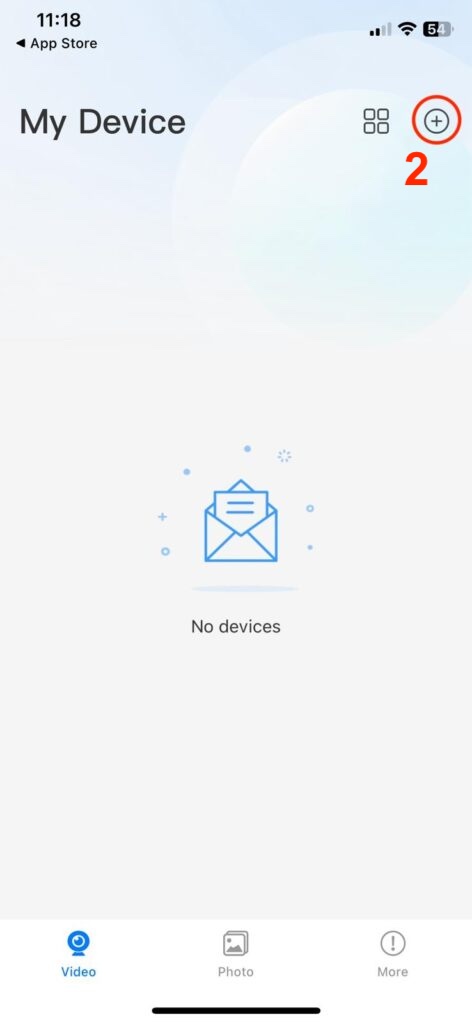
Click on the “+” button in the top right-hand corner.
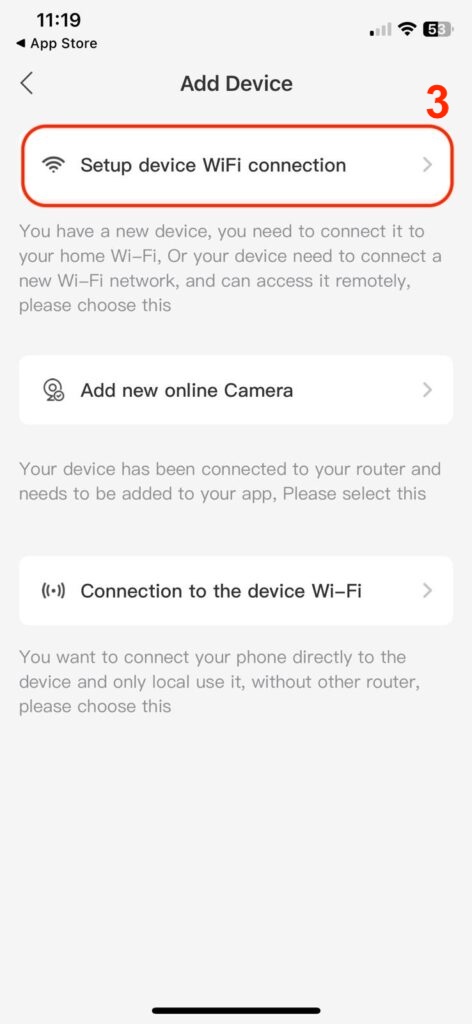
Select “Setup Device WiFi”, then click the same button again.
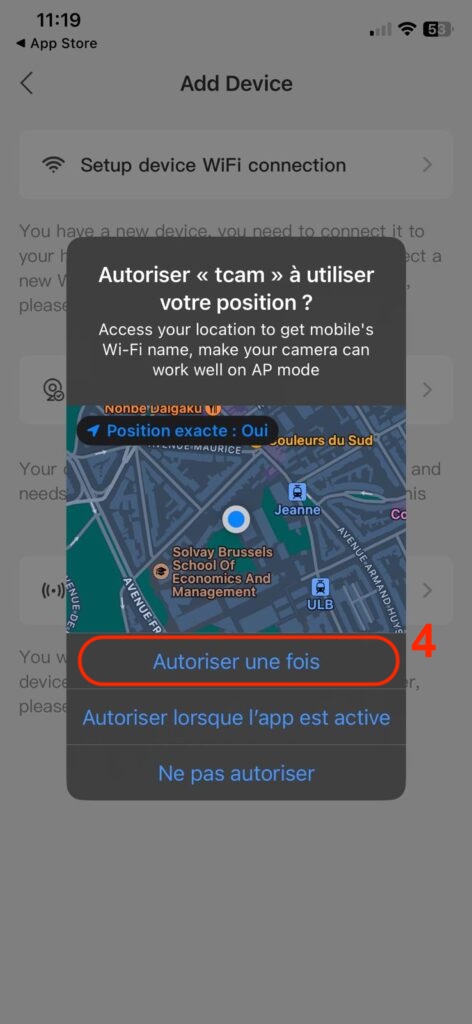
Accept authorisations (if applicable).
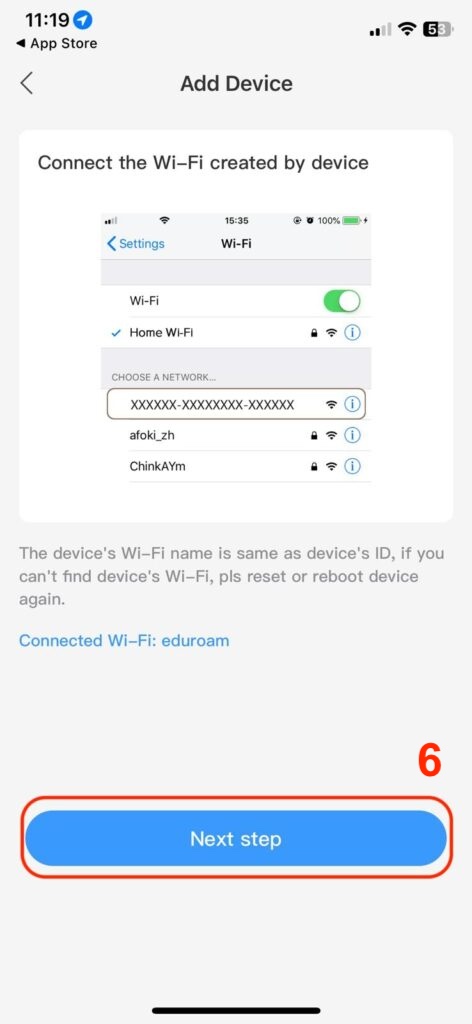
Click on “Next Step” and follow the instructions.
Click on “Next Step” and follow the instructions.
Authorise all the permissions requested.
For the moment, we’re going to ignore the camera’s connection to the house WiFi. We’ll come back to this later. Click on previous, and you’ll see that the camera is now added and connected.
3.2. First connection
When you first click on the camera image, a window will appear asking you to change the password:
Click on “Modify”.
Old password: 1234 (default).
New password: enter and confirm a new password.
Click “OK” to save.
You can now access the camera live! 🎥:
4. Connecting the camera to the WiFi network📡
Go to “Settings” → “Device Setting” → “WiFi Setting”.
Select your WiFi network from the list.
Enter the network password (make sure it is correct).
Click “OK” to save.
When the camera tries to connect, the indicator light flashes and changes colour.
4.1. Live viewing
Once the camera is connected to WiFi, it will be accessible from any Internet connection. Now connect your phone to the Internet (WiFi or mobile data).
In your phone’s wifi settings, you should no longer see the camera’s wifi name! This is normal, as the camera is now connected to your wifi router.
Return to the application and refresh the page. If everything is configured correctly, the camera will appear online.
Clicking on the device image takes you to the camera’s live video feed .
Allows you to take a photo (saved on your phone).
Starts video recording.
“SD Files” lets you view the files stored on the SD card.
The “Talk” function (📌 not available on all models) would allow you to talk through the camera.
Sets the image to full screen.
Enables you toactivate the sound to listen to what is happening.
Display Image Options.
To adjust brightness.
Changeorientation.
Enable/Disable infrared for night vision (📌 not available on all models)
💡 Important: If the connection fails, make sure you’ve entered the correct WiFi password!
5. Parameter
5.1. Basic configuration
5.1.1. Changing the camera name
If you have several cameras, it may be a good idea to give each camera a name. To change the camera name:
Click on “Settings”.
Select “Edit Device”.
In the “Device Name” field, enter the desired name (e.g. “Salon”).
Click “OK” to save.
5.1.2. Activating notifications
Go to Camera settings
Then Device Setting
To activate notifications
To change the camera password
Setting up video/photo recordings on the memory card
Camera night vision/infrared setting (📌 not available on all models).
Fix the camera again.
Resets the camera.
If the camera is not set to the correct time, ” sync Mobile Time ” will synchronise the time on your phone with the camera.
Delete device: deletes the camera from the application
A : Alarm configuration
Set the motion detection sensitivity level,
Activate this option to set the alarm times,
activate the ringing tone on the alarm.
interval between two alarms
Activate this option to receive notifications on the phone.
Display notifications on the phone’s standby/lock screen.
Save changes.
C : SD Cart Setting
Activate auto-recording to record automatically to the SD card,
Activate ” Alarm Record ” to automatically start recording a video when motion is detected,
Select the resolution of the video recorded on the SD card,
Enable audio recording on videos.
Activate continuous recording on the SD card.
Increase the recording time to its maximum, 30 min.
5.2. Advanced configuration
5.2.1. Viewing several cameras
You can view up to 4 cameras simultaneously
To divide the screen into several sections.
Click on “+” to display the list of cameras to be added
From the list, select the one you want to appear
click on “play” to view the images from this camera.
to set the camera to full screen on its square.
Mute this camera.
Bring up the options for this camera, such as removing a camera from a box.
Repeat the same operation on another square for each camera you want to appear.
5.2.2. Sharing access with another person
You can give access to the camera to several people you trust. Let’s say you give access to your girlfriend.
A- On your phone.
Click on ” setting “,
Then click on ” Device QRCode ” to generate the access QR code,
Once the other person has also downloaded the application, they can use their phone to scan the QRCode that appears on your phone.
B- On the other person’s phone.
Once the other person has also downloaded the application on their phone, click on the ” +” .
then on ” add new online camera “,
Select ” Scan QRCode “, and scan the QRCode you generated on your phone in the previous step.
accept all the necessary authorisations. Once the QRCode has been scanned, the device details will be filled in automatically. Click ” OK” to finish. At the end, you’ll see your camera added to your companion’s phone.
6. Connection problems? 🚨
The camera does not connect to Wi-Fi:
Check that the network is 2.4 GHz (not compatible with 5 GHz).
If in doubt, reset the camera.
The application does not detect the camera:
Reset the camera and start the configuration process again.
Check that your phone is connected to the same Wi-Fi network.
Jerky or slow video:
Reduce the distance between the camera and the router.
Make sure your network has sufficient bandwidth.
Thank you for reading this tutorial! See the list of products compatible with the“TCAM” application and leave a comment if you have any questions.